8. Node and Edge Column Data
Interaction networks are useful as stand-alone models. However, they are most powerful for answering scientific questions when integrated with additional information. Cytoscape allows the user to add arbitrary node, edge and network information to Cytoscape as node/edge/network data columns. This could include, for example, annotation data on a gene or confidence values in a protein-protein interaction. These column data can then be visualized in a user-defined way by setting up a mapping from columns to network properties (colors, shapes, and so on). The section on Styles discusses this in greater detail.
8.1. Import Data Table Files
Cytoscape offers support for importing data from delimited text and MS Excel data tables.
Sample Data Table 1
| Object Key | Alias | SGD ID |
|---|---|---|
| AAC3 | YBR085W|ANC3 | S000000289 |
| AAT2 | YLR027C|ASP5 | S000004017 |
| BIK1 | YCL029C|ARM5|PAC14 | S000000534 |
The data table file should contain a primary key column and at least one data column. The maximum number of data columns is unlimited. The Alias column is an optional feature, as is using the first row of data as column names. Alternatively, you can specify each column name from the File → Import → Table from File… user interface.
Basic Operation
Select File → Import → Table from File…. Alternatively, you can simply drag and drop the file from the desktop into the Table Panel, or click the Import Table from File…
 in the Table Panel interface.
Select a data file. The file can be either a text or Excel (.xls/.xlsx) file.
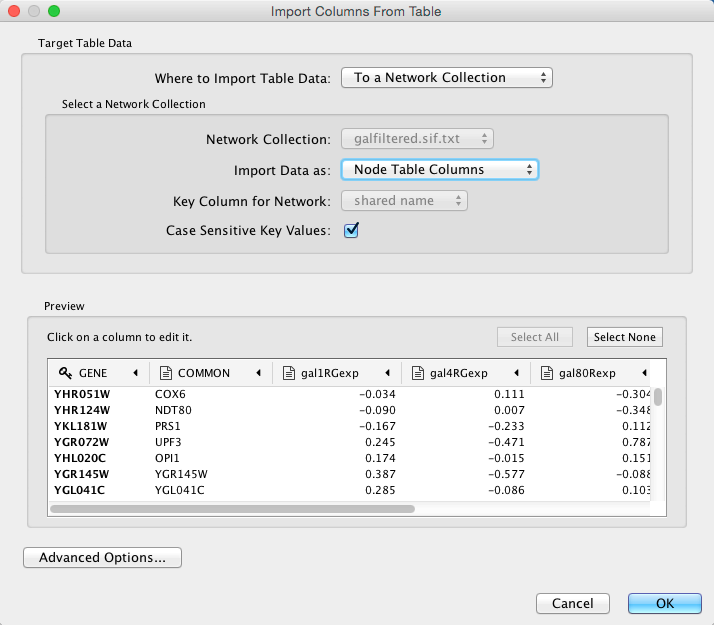
In the Target Table Data section, choose where to import the data to. You can choose an existing network collection, a specific network only, or you can choose to import the data to an Unassigned Table (described below).
Depending on what you choose in the Where to import Table Data drop-down, you will need to select a network collection or specific network. You will also need to select Import Data as, that is whether the data is node, edge or network table columns.
If the table is not properly delimited in the preview panel, change the delimiter in the Advanced Options panel. The default delimiter is tab. This step is not necessary for Excel Workbooks.
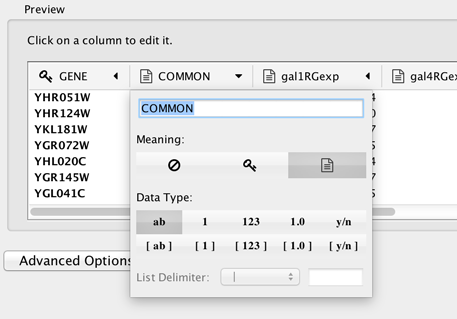
By default, the first column is designated as the primary key, as designated by the key
 icon. Make sure the column designated as key matches what’s selected
under Key Column for Network (i.e. the key in the network. To set
another column as the key instead, click the arrow at next to the column
title and select the key symbol.
icon. Make sure the column designated as key matches what’s selected
under Key Column for Network (i.e. the key in the network. To set
another column as the key instead, click the arrow at next to the column
title and select the key symbol.Similarly, to change the data type of a column, for example from integer to string, click the arrow next to the column title, and select the correct data type.
Click OK to import.
Unassigned Table
As of Cytoscape 3.1. it is possible to import data tables without assigning them to existing networks, meaning the data doesn’t have to correspond to any nodes/edges currently loaded. If a data table is imported as unassigned and a network is later imported that maps to the data in terms of nodes or edges, the data will link automatically. This is useful when loading a large dataset (for example expression data), defining a Style for visualizing the data on networks and later loading individual networks to view the data, for example from an online database. This feature allows the data to be automatically linked to any network that is applicable, without having to load the data for each network.
8.2. Legacy Cytoscape Attributes Format
In addition to tabular data, the simple attribute file format used in previous versions of Cytoscape is still supported. Node and edge data files are simply formatted: a node data file begins with the name of the column on the first line (note that it cannot contain spaces). Each following line contains the name of the node, followed by an equals sign and the data value. Numbers and text strings are the most common data types. All values for a given column must have the same type. For example:
FunctionalCategory
YAL001C = metabolism
YAR002W = apoptosis
YBL007C = ribosome
An edge data file has much the same structure, except that the name of the edge is the source node name, followed by the interaction type in parentheses, followed by the target node name. Directionality counts, so switching the source and target will refer to a different (or perhaps non-existent) edge. The following is an example edge data file:
InteractionStrength
YAL001C (pp) YBR043W = 0.82
YMR022W (pd) YDL112C = 0.441
YDL112C (pd) YMR022W = 0.9013
Since Cytoscape treats edge data as directional, the second and third edge data values refer to two different edges (source and target are reversed, though the nodes involved are the same).
Each data column is stored in a separate file. Node and edge data files use the same format, and have the suffix .attrs.
Node and edge data may be loaded via the File → Import → Table menu options, just as data table files are.
When expression data is loaded using an expression matrix, it is automatically loaded as node data unless explicitly specified otherwise.
Node and edge data columns are attached to nodes and edges, and so are independent of networks. Data values for a given node or edge will be applied to all copies of that node or edge in all loaded network files, regardless of whether the data file or network file is imported first.
Detailed file format (Advanced users)
Every data file has one header line that gives the name of the data column, and optionally some additional meta-information about that data column. The format is as follows:
columnName (class=JavaClassName)
The first field is always the column name: it cannot contain spaces. If present, the class field defines the name of the class of the data values. For example, java.lang.String or String for strings, java.lang.Double or Double for floating point values, java.lang.Integer or Integer for integer values, etc. If the value is actually a list of values, the class should be the type of the objects in the list. If no class is specified in the header line, Cytoscape will attempt to guess the type from the first value. If the first value contains numbers in a floating point format, Cytoscape will assume java.lang.Double; if the first value contains only numbers with no decimal point, Cytoscape will assume java.lang.Integer; otherwise Cytoscape will assume java.lang.String. Note that the first value can lead Cytoscape astray: for example,
floatingPointDataColumn
firstName = 1
secondName = 2.5
In this case, the first value will make Cytoscape think the values should be integers, when in fact they should be floating point numbers. It’s safest to explicitly specify the value type to prevent confusion. A better format would be:
floatingPointDataColumn (class=Double)
firstName = 1
secondName = 2.5
or
floatingPointDataColumn
firstName = 1.0
secondName = 2.5
Every line past the first line identifies the name of an object (a node in a node data file or an edge in a edge data file) along with the String representation of the data value. The delimiter is always an equals sign; whitespace (spaces and/or tabs) before and after the equals sign is ignored. This means that your names and values can contain whitespace, but object names cannot contain an equals sign and no guarantees are made concerning leading or trailing whitespace. Object names must be the node ID or edge ID as seen in the left-most column of the Table Panel if the data column is to map to anything. These names must be reproduced exactly, including case, or they will not match.
Edge names are all of the form:
sourceName (edgeType) targetName
Specifically, that is
sourceName space openParen edgeType closeParen space targetName
Note that tabs are not allowed in edge names. Tabs can be used to separate the edge name from the = delimiter, but not within the edge name itself. Also note that this format is different from the specification of interactions in the SIF file format. To be explicit: a SIF entry for the previous interaction would look like
sourceName edgeType targetName
or
sourceName whiteSpace edgeType whiteSpace targetName
To specify lists of values, use the following syntax:
listDataColumnName (class=java.lang.String)
firstObjectName = (firstValue::secondValue::thirdValue)
secondObjectName = (onlyOneValue)
This example shows a data column whose value is defined as a list of text strings. The first object has three strings, and thus three elements in its list, while the second object has a list with only one element. In the case of a list every data value uses list syntax (i.e. parentheses), and each element is of the same class. Again, the class will be inferred if it is not specified in the header line. Lists are not supported by Styles and so can’t be mapped to network properties.
Newline Feature
Sometimes it is desirable to for data values to include linebreaks, such as node labels that extend over two lines. You can accomplish by inserting into the data value. For example:
newlineDataColumn
YJL157C = This is a long\nline for a label.
Table Panel
When Cytoscape is started, the Table Panel appears in the bottom right of the main Cytoscape window. This browser can be hidden and restored using the F5 key or by unchecking the View → Show Table Panel menu option. Like other panels, the browser can be undocked by pressing the little icon in the top right corner.
To swap between displaying node, edge, and network data tables use the
tabs on the bottom of the Table Panel. By default, the Table Panel
displays columns for all nodes and edges in the selected network. To
display columns for only selected nodes/edges, click the Change Table
Mode button
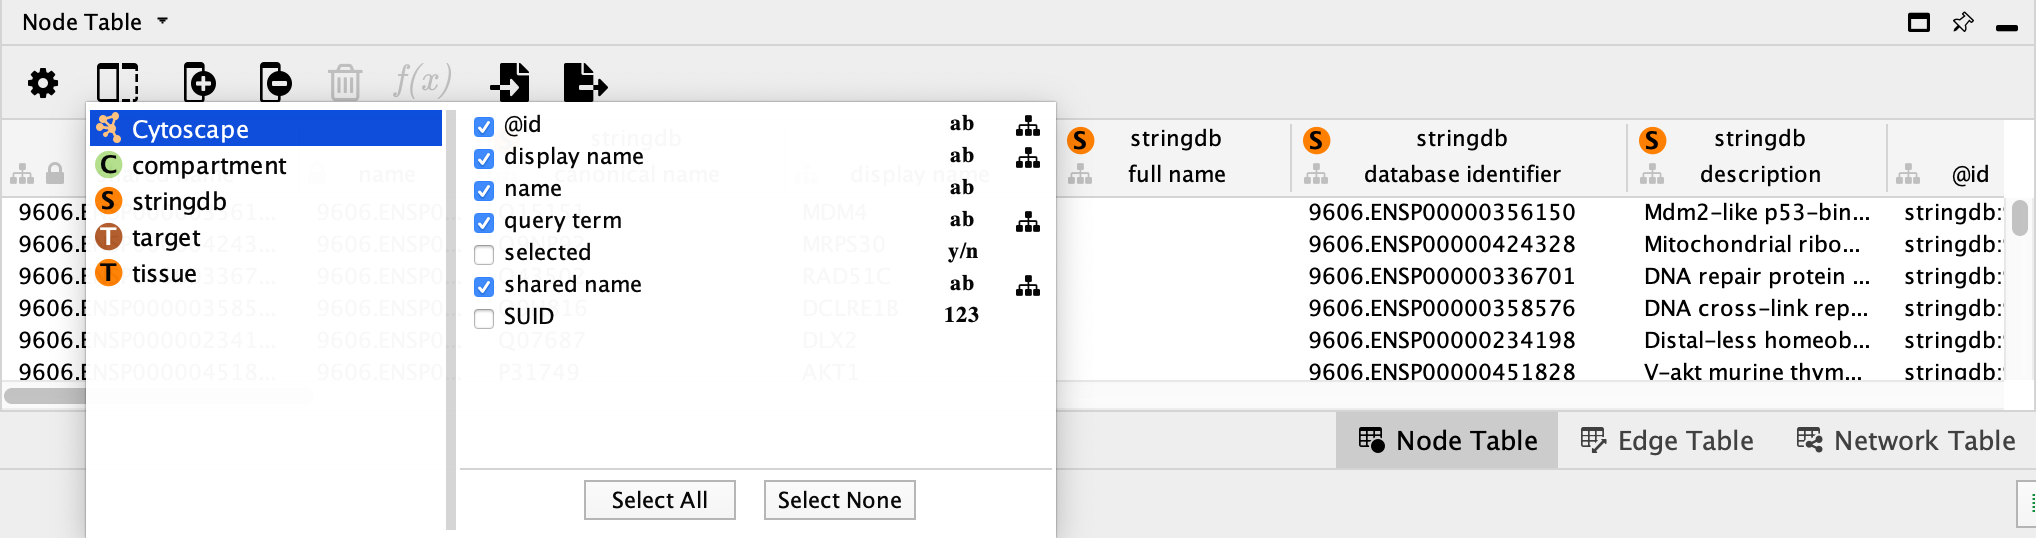
 at the top left. To change the columns that are displayed, click the
Show Column
at the top left. To change the columns that are displayed, click the
Show Column
 button and choose the columns that are to be displayed (select various
columns by clicking on them, and then click elsewhere on the screen to
close the column list).
button and choose the columns that are to be displayed (select various
columns by clicking on them, and then click elsewhere on the screen to
close the column list).
Editing the Table Panel and Values
Most column values can be edited by double-clicking the cell (only the ID cannot be edited). Newline characters can be inserted into String columns either by pressing Enter or by typing \n. Once finished editing, click outside of the editing cell in the Table Panel or press Shift-Enter to save your edits. Pressing Esc while editing will undo any changes.
Rows in the panel can be sorted alphabetically by specific column by
clicking on a column heading. A new column can be created using the
Create New column
 button, and must be one of four types - integer, string, real number
(floating point), or boolean. Columns can be deleted using the Delete
Columns…
button, and must be one of four types - integer, string, real number
(floating point), or boolean. Columns can be deleted using the Delete
Columns…
 button. NOTE: Deleting columns removes them from Cytoscape, not just
the Table Panel! To remove columns from the panel without deleting
them, simply unselect the column using the Select Columns
button.
button. NOTE: Deleting columns removes them from Cytoscape, not just
the Table Panel! To remove columns from the panel without deleting
them, simply unselect the column using the Select Columns
button.
Columns in the Table Panel can be renamed by right-clicking on the column header and selecting Rename Column…. The Table Panel supports name spaces, so if you have several columns with related information, you can create a namespace. Namespace and column name are separated by a double colon (::). For example, if the data includes multiple columns with cellular compartment information, you can edit the column titles in the format compartment::cytosol, compartment::endosome etc, which will create a namespace compartment with several associated columns. It is then possible to perform operations such as Show/Hide on all columns in a namespace.
Export Table Panel
To export the entire contents of the Table Panel, click the Export Table to File… button
 .
.
It is also possible to copy and paste directly between the Table Panel and an external application (for example Excel), simply by selecting a set of cells in the table by click and drag, followed by normal keyboard shortvuts for copy and paste. This removes the need to export the table to a file in order to insert the data into an application such as Excel!
8.3. Import Data Table from Public Databases
It is also possible to import node data columns from public databases via web services, for example from BioMart (https://www.ensembl.org/info/data/biomart/index.html).
Basic Operation
Load a network, for example galFiltered.sif.
Select File → Import → Table from Public Databases….
You will first be asked to select from a set of web services. For this example, we will choose ENSEMBL GENES 104.
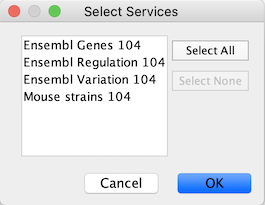
In the Import Data Table from Public Databases dialog, select a Service. Since the galFiltered network is from yeast, select ENSEMBL GENES - SACCHAROMYCES CEREVISIAE.
For Key Column in Cytoscape, select COMMON for Column and Gene Name(s) for Data Type.
The type of identifier selected under Data Type must match what is used in the selected Column in the network.
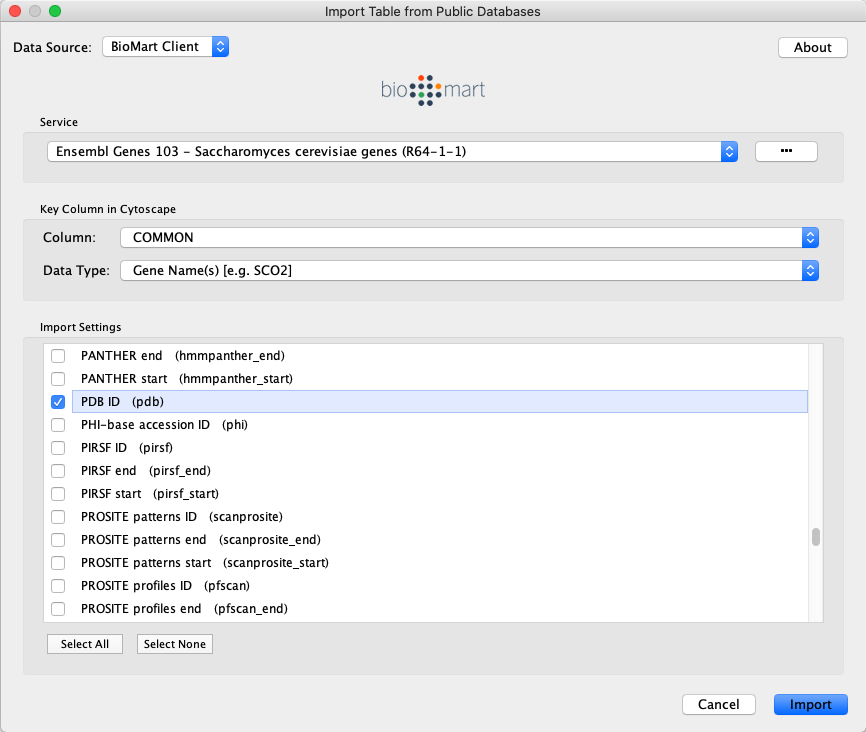
Select the data columns you want to import.
Select Import.
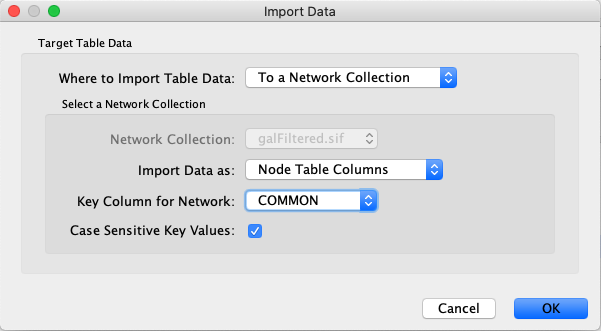
In the Import Data interface, select select COMMON for Key Column for Network.
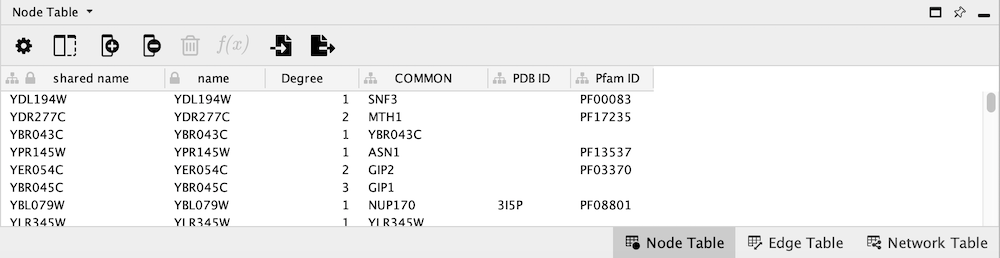
When import is complete, you can see the newly imported data columns in the Table Panel.
8.4. Mapping Identifiers
A common problem in integrating multiple data sources is differences in terminology. Standardized identifiers have many dialects. Some databases are specific to a particular organism or genome. Others span those boundaries. BridgeDB is a web service devoted to solving the id mapping problem. Cytoscape contains simple access to BridgeDB. If you need more esoteric species or data sources, there is an installable BridgeDB app to access a fuller feature set.
Ensembl is used as the canonical taxonomy. A translation between two arbitrary data sources is generally achieved by mapping each through Ensembl.
To map an identifier from one source to another, right click on the column header of your identifier. Select the option to Map Column…
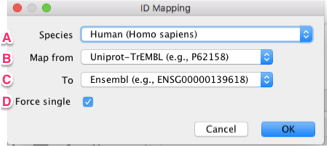
A. The mapping is always constrained by species to prevent senseless matches across species. You must choose a species (once) for this feature to function properly. The choices for the Data Source and Target are determined by the species.
B. Based on the items in the column you chose we can make a reasonable assumption as to the database as to use as the source for your mapping. If this is not the source, you can override it in the Map from field.
C. The target database of the identifier mapping. This list is filtered by species and curated down to the most common options. A full list of supported targets is here.
D. In some cases where there are multiple answers, the Force Single option limits the result to the first answer returned by the service. If the option is off, a list of results will appear in the column.